Table of Contents
- Overall
- Buy materials and wait for delivery
- Set up Jetson-Nano
- Building jetson-inference
- Good to go, start real-time detecting via pre-trained ssd model
- Update on Course 2 - JetBot (optional)
- Update on Course 3 - Hello AI World
- Hook up object detection result with AWS-IoT (or other cloud services)
- Misc
- Todo
- More links
0. Overall
Youtube https://www.youtube.com/watch?v=bcM5AQSAzUY&ab_channel=NVIDIADeveloper
Article https://developer.nvidia.com/blog/realtime-object-detection-in-10-lines-of-python-on-jetson-nano/
1. Buy materials and wait for delivery
NVIDIA Jetson Nano Developer Kit
- https://developer.nvidia.com/embedded/jetson-nano-developer-kit
- I bought it from Amazon, and it took one week to actually deliver in my hands.
Power Supply: 5V 4A (4000mA) switching power supply - UL Listed
- https://www.adafruit.com/product/1466
- I bought it without registration, just checkout and input payment and all done, you can leave an email address for delivery updates etc.
- Actually, this Power Supply is just half the price of the delivery cost…but to avoid any hassles later, I decided to pay for the extra delivery to save myself a couple of hours fixing devices.
- Sub-Total: $14.95
- DHL Express (1 x 0.62lbs) (Express Worldwide): $31.43
- Sales Tax: $0.00
- Total: $46.38
High-performance microSD card
USB data cable: Micro-B To Type-A with DATA enabled
USB Webcam (used in final notebook only) such as the Logitech C270 USB Webcam
I have to say, Amazon delivery is much better and less costly.
2. Set up Jetson-Nano
Then follow https://developer.nvidia.com/embedded/learn/get-started-jetson-nano-devkit
- Here is the user guide pdf https://developer.download.nvidia.com/assets/embedded/secure/jetson/Nano/docs/NV_Jetson_Nano_Developer_Kit_User_Guide.pdf
Prepare microSD Card
- https://developer.nvidia.com/embedded/learn/get-started-jetson-nano-devkit#write
- I took a screenshot of this page, just in case in future this page is moved or lost at https://keypointt.com/assets/screencapture_developer_nvidia_embedded_learn_get_started_jetson_nano_devkit.png
Install v4l-utils, this is not mentioned in the tutorial, but my jetson-nano does not have it pre-installed:
sudo apt -y install v4l-utils
In the tutorial, there is no mention of installing a webcam driver and its related setup. In my experiment here, I installed cheese as a webcam testing tool to mount video1, but later real-time detecting, it’s still using default video0 as in my python code below.
sudo apt install cheese

cheese -d /dev/video1 # this command will pop up a window with camera streaming

v4l2-ctl --list-devices # show camera devices
If I list my camera, I get the logitech one:
xin@xin-desktop:~/jetson-inference/build/aarch64/bin$ v4l2-ctl --list-devices
C270 HD WEBCAM (usb-70090000.xusb-2.1):
/dev/video0

xin@xin-desktop:~/jetson-inference/build/aarch64/bin$
3. Building jetson-inference
Follow https://github.com/dusty-nv/jetson-inference/blob/master/docs/building-repo-2.md
The difference from the above tutorial and from the YouTube video is the command make -j$(nproc) as in the GitHub page, but in the YouTube video, it’s just make. Either is fine.
Below is what I used.
$ sudo apt-get update
$ sudo apt-get install git cmake libpython3-dev python3-numpy
$ git clone --recursive https://github.com/dusty-nv/jetson-inference
$ cd jetson-inference
$ mkdir build
$ cd build
$ cmake ../
$ make
$ sudo make install
$ sudo ldconfig
4. Good to go, start real-time detecting via pre-trained ssd model
First, play around with some static images, to get some intuition:
cd /home/xin/jetson-inference/build/aarch64/bin

./detectnet-console.py images/peds_0.jpg output_0.jpg
./detectnet-console.py images/peds_1.jpg output_1.jpg
./detectnet-console.py images/airplane_0.jpg output_2.jpg
./detectnet-console.py images/cat_0.jpg output_3.jpg
./detectnet-console.py images/dog_0.jpg output_4.jpg
./detectnet-console.py images/horse_0.jpg output_5.jpg
detectnet is actually calling https://github.com/dusty-nv/jetson-inference/blob/master/python/examples/detectnet.py. Core inference is detections = net.Detect(img, overlay=args.overlay) where we can log inference results or do something else.
from jetson_inference import detectNet
from jetson_utils import videoSource, videoOutput, logUsage

while True:
    # capture the next image
    img = input.Capture()

    # detect objects in the image (with overlay)
    detections = net.Detect(img, overlay=args.overlay)

    # print the detections
    print("detected {:d} objects in image".format(len(detections)))

    for detection in detections:
        print(detection)

    # render the image
    output.Render(img)

    # update the title bar
    output.SetStatus("{:s} | Network {:.0f} FPS".format(args.network, net.GetNetworkFPS()))

    # print out performance info
    net.PrintProfilerTimes()

    # exit on input/output EOS
    if not input.IsStreaming() or not output.IsStreaming():
        break
Then the exciting part of real-time streaming detection, getting below from GitHub sample and the only change I made is using /dev/video0 as video source.
- Note: the code in GitHub is different from the code in the YouTube video.
- I just used the GitHub version of the code, as I assume Dustin made the YouTube video a couple of years back but the code on GitHub is updated.
my_dashboard.py code:
import jetson.inference
import jetson.utils

net = jetson.inference.detectNet("ssd-mobilenet-v2", threshold=0.5)
camera = jetson.utils.videoSource("/dev/video0")      # '/dev/video0' for V4L2
display = jetson.utils.videoOutput("display://0")     # 'my_video.mp4' for file

while display.IsStreaming():
    img = camera.Capture()
    detections = net.Detect(img)
    display.Render(img)
    display.SetStatus("Object Detection | Network {:.0f} FPS".format(net.GetNetworkFPS()))
And, starting detecting code and it’s working!
cd
python my_dashboard.py
Here is my demo on real-time object detection:
5 . I want to perform extra customized action based on real-time object detection, how?
First, start from small, edit the detectnet.py in build folder with path ~/jetson-inference/build/aarch64/bin to print a customized line on a single static image detection,
adding a line print("Xin is about to do something on the inference dectection results")
for detection in detections:
	print(detection)

print("Xin is about to do something on the inference dectection results")

    # render the image
output.Render(img)
And if I run the modified py script, the newly added print line is in effect and being grep-ed.
xin@xin-desktop:~/jetson-inference/build/aarch64/bin$ vim detectnet.py

xin@xin-desktop:~/jetson-inference/build/aarch64/bin$ ./detectnet.py images/peds_0.jpg output_0.jpg | grep Xin
Xin is about to do something on the inference dectection results
xin@xin-desktop:~/jetson-inference/build/aarch64/bin$
Nice, now, move from a single static image to a real-time camera. I need to modify detectnet.py:
- input/output, from original reading from input parameters to hard-coded device path of my jetson-nano setup
- keep the print line
print("Xin is about to do something on the inference dectection results"), more, filter specific class for another actionif net.GetClassDesc(detection.ClassID) == 'person':
Full code as:
import sys
import argparse

from jetson_inference import detectNet
from jetson_utils import videoSource, videoOutput, logUsage

# parse the command line
parser = argparse.ArgumentParser(description="Locate objects in a live camera stream using an object detection DNN.",
                                 formatter_class=argparse.RawTextHelpFormatter,
                                 epilog=detectNet.Usage() + videoSource.Usage() + videoOutput.Usage() + logUsage())

parser.add_argument("input_URI", type=str, default="", nargs='?', help="URI of the input stream")
parser.add_argument("output_URI", type=str, default="", nargs='?', help="URI of the output stream")
parser.add_argument("--network", type=str, default="ssd-mobilenet-v2", help="pre-trained model to load (see below for options)")
parser.add_argument("--overlay", type=str, default="box,labels,conf", help="detection overlay flags (e.g. --overlay=box,labels,conf)\nvalid combinations are:  'box', 'labels', 'conf', 'none'")
parser.add_argument("--threshold", type=float, default=0.5, help="minimum detection threshold to use")

is_headless = ["--headless"] if sys.argv[0].find('console.py') != -1 else [""]

try:
	args = parser.parse_known_args()[0]
except:
	print("")
	parser.print_help()
	sys.exit(0)

# create video sources and outputs
#input = videoSource(args.input_URI, argv=sys.argv)
#output = videoOutput(args.output_URI, argv=sys.argv+is_headless)

input = videoSource("/dev/video0")
output = videoOutput("display://0")

# load the object detection network
net = detectNet(args.network, sys.argv, args.threshold)

# note: to hard-code the paths to load a model, the following API can be used:
#
# net = detectNet(model="model/ssd-mobilenet.onnx", labels="model/labels.txt",
#                 input_blob="input_0", output_cvg="scores", output_bbox="boxes",
#                 threshold=args.threshold)

# process frames until the user exits
while True:
	# capture the next image
	img = input.Capture()

	# detect objects in the image (with overlay)
	detections = net.Detect(img, overlay=args.overlay)

	# print the detections
	print("detected {:d} objects in image".format(len(detections)))

	for detection in detections:
		if net.GetClassDesc(detection.ClassID) == 'person':
			# perform a custom action
			print('detected a person!')
        	print("Xin is about to do something on the inference dectection results")

		print(detection)

	print("Xin is about to do something on the inference dectection results")

        # render the image
	output.Render(img)

	# update the title bar
	output.SetStatus("{:s} | Network {:.0f} FPS".format(args.network, net.GetNetworkFPS()))

	# print out performance info
	net.PrintProfilerTimes()

	# exit on input/output EOS
	if not input.IsStreaming() or not output.IsStreaming():
		break
Then run this modified script, and I got the print line in effect while real-time detection as usual. Here my demo:
xin@xin-desktop:~/jetson-inference/build/aarch64/bin$ ./detectnet.py
[TRT]    ------------------------------------------------
[TRT]    Timing Report networks/SSD-Mobilenet-v2/ssd_mobilenet_v2_coco.uff
[TRT]    ------------------------------------------------
[TRT]    Pre-Process   CPU   0.07172ms  CUDA   0.83979ms
[TRT]    Network       CPU  53.65486ms  CUDA  42.77724ms
[TRT]    Post-Process  CPU   0.04636ms  CUDA   0.04724ms
[TRT]    Visualize     CPU   0.24578ms  CUDA  10.53187ms
[TRT]    Total         CPU  54.01872ms  CUDA  54.19614ms
[TRT]    ------------------------------------------------

detected 1 objects in image
<detectNet.Detection object>
   -- ClassID: 1
   -- Confidence: 0.921387
   -- Left:    0
   -- Top:     8.96484
   -- Right:   1033.75
   -- Bottom:  715.078
   -- Width:   1033.75
   -- Height:  706.113
   -- Area:    729945
   -- Center:  (516.875, 362.021)
Xin is about to do something on the inference dectection results
More demo as below, on customized action based on different detection class results: if net.GetClassDesc(detection.ClassID) == 'person': then print detected a person!
6 . I want to use my own model for real-time object detection, how?
Similar to above customized action, I still modified detectnet.py.
- commented out original net from arguement parsing, but give it the local path of my customized model to load
detectNet(model="model/ssd-mobilenet.onnx", ...)
# load the object detection network
#net = detectNet(args.network, sys.argv, args.threshold)

# note: to hard-code the paths to load a model, the following API can be used:

net = detectNet(model="model/ssd-mobilenet.onnx", labels="model/labels.txt",
                input_blob="input_0", output_cvg="scores", output_bbox="boxes",
                threshold=args.threshold)
7. Update on Course 2 - JetBot (optional)
I think for the JetBot, the key part is the wifi setup. In the above experiment, I connected an ethernet cable, but here for JetBot, wifi is enabled so remote ssh to this IP address is possible, just like remote code execution.
So then we can go to https://<jetbot_ip>:8888 from a web browser and start programming JetBot, remote ssh via headless mode (as in “Initial Setup Headless Mode”)
- https://developer.nvidia.com/embedded/learn/get-started-jetson-nano-devkit#setup
- https://jetbot.org/master/software_setup/docker.html
Example code in notebook in https://github.com/sangyy/jetson-dlinano/blob/master/classification/.ipynb_checkpoints/classification_interactive-checkpoint.ipynb
import torch.nn.functional as F

def live(state_widget, model, camera, prediction_widget, score_widget):
    global dataset
    while state_widget.value == 'live':
        image = camera.value
        preprocessed = preprocess(image)
        output = model(preprocessed)
        output = F.softmax(output, dim=1).detach().cpu().numpy().flatten()
        category_index = output.argmax()
        prediction_widget.value = dataset.categories[category_index]
        for i, score in enumerate(list(output)):
            score_widgets[i].value = score
Basically, from this code block, more actions can be plugged in after the output = F.softmax(output, dim=1).detach().cpu().numpy().flatten(). For example, a simpler counter can be added, and it will emit some metrics to say AWS CloudWatch for further metrics aggregation and dashboard building.
import torch.nn.functional as F
import time

def update(change):
    global blocked_slider, robot
    x = change['new']
    x = preprocess(x)
    y = model(x)

    # we apply the `softmax` function to normalize the output vector so it sums to 1 (which makes it a probability distribution)
    y = F.softmax(y, dim=1)

    prob_blocked = float(y.flatten()[0])

    blocked_slider.value = prob_blocked

    if prob_blocked < 0.5:
        robot.forward(speed_slider.value)
    else:
        robot.left(speed_slider.value)

    time.sleep(0.001)

update({'new': camera.value})  # we call the function once to initialize
The core part is the y = F.softmax(y, dim=1) inference step, from inference result any action can be performed.
Useful template and workflow inspiration, but if I need some models really good, large-scale training on customization is a must.
8. Update on Course 3 - Hello AI World
Basically, this course is similar to the above initial real-time detection.
- Generate training data
- Train
- Turn on the camera to demo model performance
To re-train the mobile-ssd model used in initial real-time detection, the tutorial is at https://github.com/dusty-nv/jetson-inference/blob/master/docs/pytorch-collect-detection.md
cd jetson-inference/python/training/detection/ssd
python3 train_ssd.py --dataset-type=voc --data=data/<YOUR-DATASET> --model-dir=models/<YOUR-MODEL>

NET=models/<YOUR-MODEL>
detectnet --model=$NET/ssd-mobilenet.onnx --labels=$NET/labels.txt \
          --input-blob=input_0 --output-cvg=scores --output-bbox=boxes \
            csi://0
And the model code is actually using https://github.com/dusty-nv/pytorch-ssd/blob/21383204c68846bfff95acbbd93d39914a77c707/train_ssd.py
- If more actions are needed from inference results, it will be something similar to the
test()function.
9. So then, hook up object detection result with AWS-IoT (or other cloud services) to open door to numerous downstream actions
NVIDIA DeepStream SDK is an accelerated framework to build managed intelligent video analytics apps and services.
An older version of “Deploy AI with AWS ML IOT Services on Jetson Nano”:
- Youtube: https://www.youtube.com/watch?v=Ifwf-vq7A6A&ab_channel=NVIDIADeveloper
- AWS post: https://aws.amazon.com/blogs/iot/how-to-integrate-nvidia-deepstream-on-jetson-devices-with-aws-iot-core-and-aws-iot-greengrass/
- Github: https://github.com/awslabs/aws-iot-core-integration-with-nvidia-deepstream

An updated version of it, a better wrapper in SDK:
- Youtube: “DeepStream SDK — Accelerating Real Time AI Based Video and Image Analytics”, with an interesting Amazon-Go use case for customer tracking https://www.youtube.com/watch?v=ANAljY680mE&ab_channel=NVIDIADeveloper
- Another Youtube video, on explaining object tracking: https://www.youtube.com/watch?v=4nV-GtqggEw&ab_channel=NVIDIADeveloper
- Object tracking, with ID-assignment persistent over time
- DeepStream offering 3 object tracker alternatives (NvDCF, DeepSORT, or IOU)
- Another interesting net
VehicleMakeNet, to detect brand/make - Another vehicle detection example using
DeepStream-Yolo: https://github.com/alxandru/vehicle_tracking_deepstream
- Another interesting net
- Getting started with DeepStream: https://developer.nvidia.com/deepstream-getting-started?ncid=so-yout-711163&sfdcid=EM08#get-started
- Another Youtube video, on explaining object tracking: https://www.youtube.com/watch?v=4nV-GtqggEw&ab_channel=NVIDIADeveloper
- Github: https://github.com/aws-samples/amazon-sagemaker-aws-greengrass-custom-object-detection-model/tree/master/data-prep
- AWS post: https://aws.amazon.com/blogs/machine-learning/build-machine-learning-at-the-edge-applications-using-amazon-sagemaker-edge-manager-and-aws-iot-greengrass-v2/
- Awesome use case: livestock management “One of the applications of tracking animals is to count them. Counting pigs can be hard; they move quickly, they turn around, they all look the same!”
- Amazon SageMaker Object Detection for Bird Species:
- Notebook: https://github.com/aws/amazon-sagemaker-examples/blob/main/introduction_to_amazon_algorithms/object_detection_birds/object_detection_birds.ipynb
- Note: This notebook is just for static training data, not real-time detection.
- After model deployed, there is a function
def show_bird_prediction(filename, ep, thresh=0.40): - Inference request is like
endpoint_response = runtime.invoke_endpoint(EndpointName=ep, ContentType="image/jpeg", Body=b) - And then get inference result
results = endpoint_response["Body"].read()
- After model deployed, there is a function
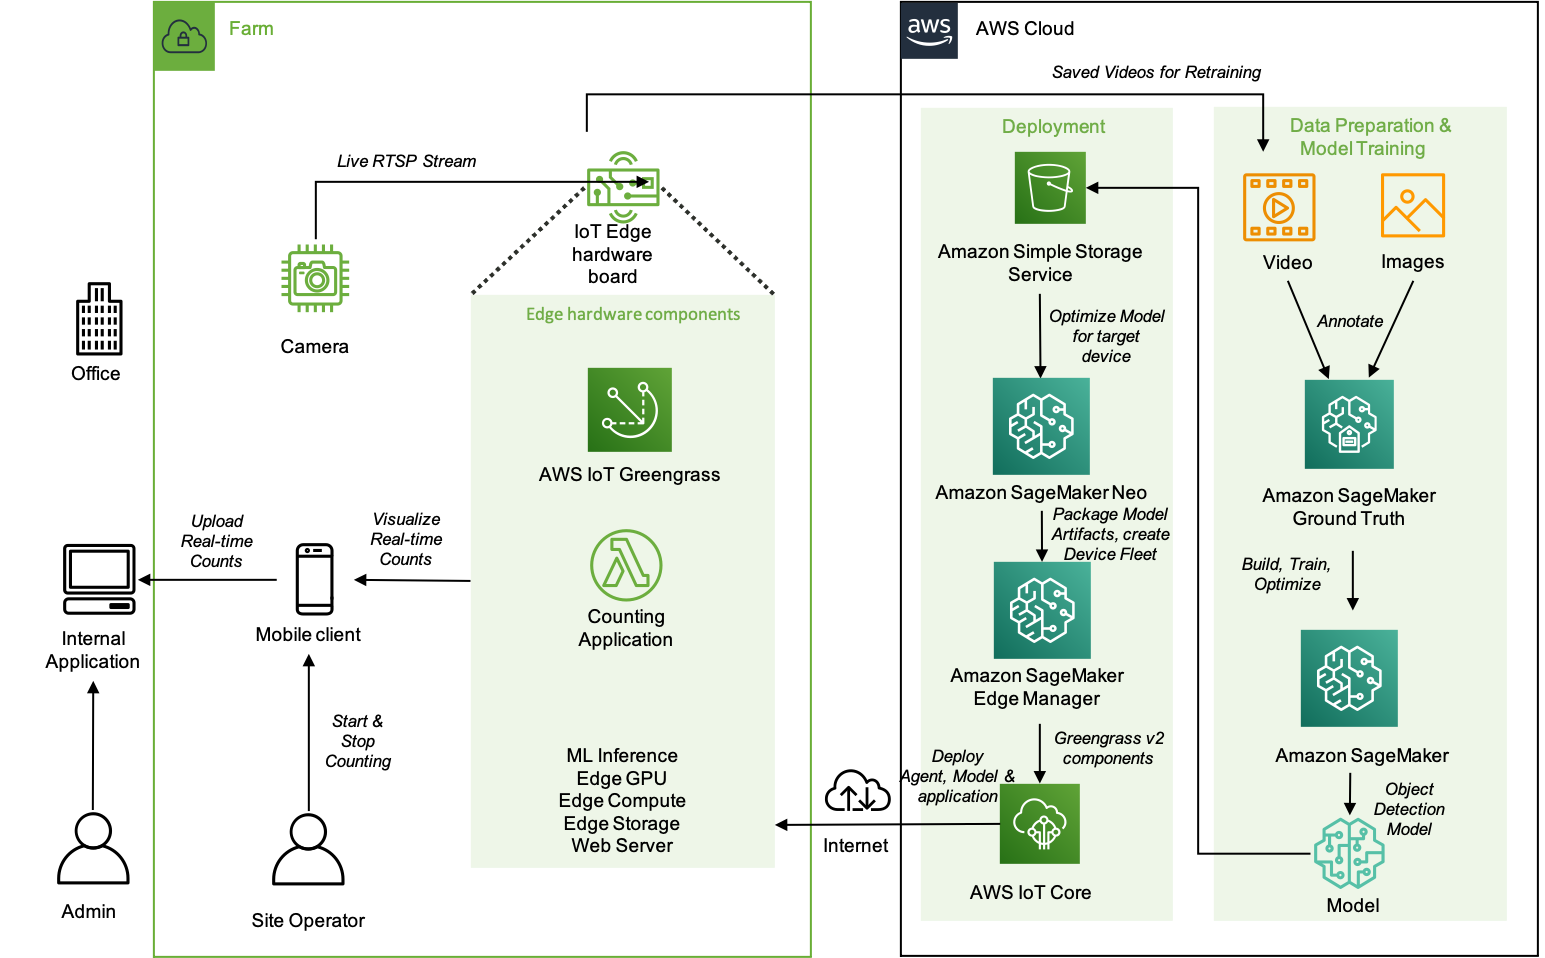
- New AWS stuff:
- “SageMaker Edge”: https://aws.amazon.com/sagemaker/edge/
- Data labeling, Github example: https://github.com/aws-samples/amazon-sagemaker-aws-greengrass-custom-object-detection-model/tree/master/data-prep
- SageMaker Data Labeling: https://aws.amazon.com/sagemaker/data-labeling
- Amazon Mechanical Turk, crowdsourcing marketplace, Amazon Sagemaker Ground Truth Plus: Fully managed data labeling service https://www.mturk.com/
- An example of how to easily deploy an ML model, Edge Manager, and AWS IoT Greengrass Lambda function using AWS IoT Greengrass V2 custom components:

10. Misc
To run Jetson-Nano on an AWS instance, we need to enable Jetson Containers on an x86 workstation (using qemu).
11. Todo (soon, or maybe never…)
Train some customized model for vehicle make detection/counting for my home street, or squirrel species detection, or bird species detection.
===> If my kids ask for it, then I will do it…
Todo
- How to use DeepStream on Jetson: https://github.com/alxandru/vehicle_tracking_deepstream
- Jetson Nano DeepStream NvDCF tracking model: https://docs.nvidia.com/metropolis/deepstream/dev-guide/text/DS_plugin_gst-nvtracker.html
- More reading on this: https://github.com/dusty-nv/jetson-inference
More links
- Youtube playlist Jetson fundamentals: https://www.youtube.com/playlist?list=PL5B692fm6–uQRRDTPsJDp4o0xbzkoyf8
- Season-1 Jupyter notebooks: https://github.com/sangyy/jetson-dlinano
- Season-2 Jupyter notebooks: https://github.com/NVIDIA-AI-IOT/jetbot/tree/master/notebooks
- Season-3: https://github.com/dusty-nv/jetson-inference/blob/master/python/examples/detectnet.py
- Jetbot community ideas: https://developer.nvidia.com/embedded/community/jetson-projects#jetbot
- Youtube playlist Jetson AI Labs: https://www.youtube.com/playlist?list=PL5B692fm6–sdf3tQk-1kp9T65y8p-D5u
- Deploy GPU-enabled Kubernetes Pod on NVIDIA Jetson Nano, seems hacky and need to recompile NVIDIA Jetson Nano’s Kernel for K8s and deploy the kernel:
- https://forums.developer.nvidia.com/t/live-camera-for-mobilenet-ssd-model-if-a-persion-detected-send-a-counter-metric-message-to-aws-cloudwatch/240454/1